Creating Lacey Balls Fairy Lights: A Detailed Guide for Crocheters
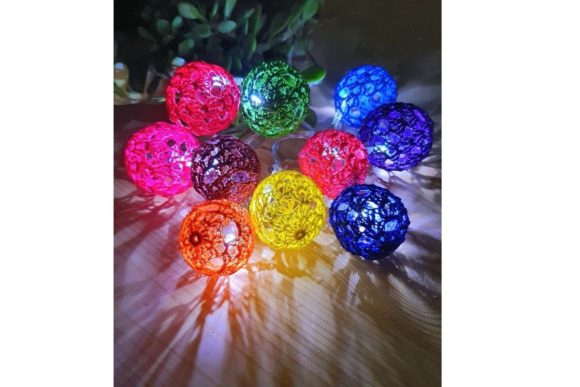
Crocheting Lacey Balls with Fairy Lights is a delightful project that combines the elegance of lacework with the enchanting glow of soft, twinkling lights. This unique craft offers both aesthetic appeal and functional beauty, making it ideal for holiday decorations, home accents, or even as gifts. Whether you're an intermediate crocheter looking to expand your skills or someone interested in exploring new creative projects, this guide provides a clear, step-by-step approach to crafting your own Lacey Balls Fairy Lights.
The Appeal of Lacey Balls with Fairy Lights
Lacey Balls are a classic form of lacework known for their intricate patterns and delicate structure. When combined with fairy lights, they transform into stunning decorative pieces that can be used in various settings. The combination of soft light and delicate texture creates a magical ambiance, perfect for adding charm to any room or outdoor space.
These balls are not just visually appealing; they also offer practical benefits. They can be used as centerpieces, wall hangings, or even as part of larger installations. Their lightweight nature makes them easy to handle and display, while their versatility allows for customization based on personal preference or specific event needs.
Materials and Tools Required
Before diving into the crocheting process, it's essential to gather all the necessary materials and tools. Here's a list of what you'll need:
- Size 20 crochet cotton thread – this is the recommended material for achieving the right balance between durability and delicacy.
- A .75mm crochet hook – this size ensures that the stitches are tight enough to maintain the ball's shape while allowing for the intricate patterns to show through.
- Fairy lights – choose LED lights for energy efficiency and longevity. These can be purchased in various lengths and color options.
- Scissors – for cutting the thread and wiring.
- Wire cutters – if you're using metal wire for attaching the lights.
- Glue gun and glue sticks – for securing the lights in place.
- Optional: Decorative elements such as beads, sequins, or ribbons for added flair.
Having these materials ready will ensure a smooth and enjoyable crocheting experience. The use of high-quality materials is crucial for the final outcome, as it directly affects the durability and appearance of the finished product.
Understanding the Pattern Structure
The pattern for Lacey Balls Fairy Lights is designed to be easy to follow, even for those with some experience in crocheting. Each ball measures approximately 1 1/2 inches (4 cm) in diameter, making them manageable and suitable for a variety of applications.
The pattern includes detailed instructions for each step, along with visual aids provided in a 16-page PDF. These illustrations are invaluable for understanding the flow of the pattern and ensuring that each stitch is executed correctly. The PDF format allows for easy reference and can be printed or viewed digitally, depending on your preference.
One of the key advantages of this pattern is its emphasis on clarity and simplicity. It avoids complex terminology and instead uses straightforward language to guide the crocheter through each phase of the project. This makes it accessible to a wide range of skill levels, including those who are still developing their crocheting techniques.
Step-by-Step Crochet Instructions
Following the pattern is a straightforward process that involves several key steps. Below is a simplified overview of the crocheting process:
- Start with a foundation chain: Begin by creating a chain of the required length, which serves as the base for the ball.
- Work in rounds: Using the specified stitches, work in continuous rounds to build up the structure of the ball. Pay attention to the pattern’s instructions to ensure that each round is completed accurately.
- Incorporate the lace design: The pattern includes specific instructions for creating the lacy texture. This involves alternating between different types of stitches to achieve the desired effect.
- Finish the ball: Once the ball reaches the desired size, secure the ends of the thread and weave in any loose ends to give the finished piece a polished look.
- Add fairy lights: After the ball is complete, carefully attach the fairy lights using a glue gun or by threading them through the holes created during the crocheting process.
Each step is designed to be intuitive, allowing the crocheter to focus on the creative aspects of the project without getting lost in complicated instructions. The inclusion of visual guides in the PDF further enhances the learning experience, making it easier to identify and correct any mistakes during the process.
Customization and Creative Possibilities
While the basic pattern provides a solid foundation, there are numerous ways to customize your Lacey Balls Fairy Lights. Experimenting with different colors, textures, and accessories can help you create unique pieces that reflect your personal style or suit specific occasions.
For example, you can incorporate beads or sequins into the crocheting process to add a touch of sparkle. Alternatively, you can use different types of thread to alter the color palette or adjust the firmness of the finished ball. Additionally, varying the size of the balls can allow for a more dynamic display, whether you're creating a single statement piece or a collection of smaller, more delicate items.
These customizations not only enhance the visual appeal of the project but also encourage creativity and experimentation. By tailoring the design to your preferences, you can make each Lacey Ball Fairy Light a one-of-a-kind creation.
Where to Use Your Lacey Balls Fairy Lights
The versatility of Lacey Balls Fairy Lights makes them suitable for a wide range of applications. Here are some common use cases:
- Home decor: Hang them on walls, ceilings, or mantles to add a whimsical touch to your living space.
- Event decoration: Use them as centerpieces at weddings, parties, or holiday gatherings to create a magical atmosphere.
- Gifting: Present them as handmade gifts for friends, family, or colleagues, especially during festive seasons.
- Outdoor displays: Place them in gardens, patios, or porches to enjoy their glow throughout the evening.
- Art installations: Combine multiple balls to create larger, more elaborate art pieces that can be displayed in galleries or public spaces.
No matter where you choose to use your Lacey Balls Fairy Lights, their soft glow and delicate design will undoubtedly make a lasting impression.
Conclusion
Crocheting Lacey Balls with Fairy Lights is a rewarding and creative endeavor that offers both artistic satisfaction and practical utility. With the right materials, clear instructions, and a bit of patience, anyone can create beautiful, glowing decorations that bring warmth and charm to any setting.
This project is included in the CF Class "Learn to Crochet Lacey Balls with Fairy Lights," which provides additional guidance and support for those interested in mastering this technique. Be sure to check out the class for more insights and inspiration as you embark on your own crocheting journey.